Valentine’s Day Sugar Cookies are the ultimate expression of edible affection for your loved ones. There is something truly magical about pulling a tray of perfectly baked heart-shaped sugar cookies straight from the oven.
When you capture that soft natural daylight streaming in from the side of your kitchen, the visual appeal of these treats is simply undeniable. These cookies boast perfectly flat bases that make decorating a breeze, giving way to delightfully slightly puffy centers that promise a soft, tender bite.
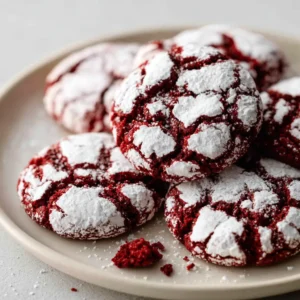
The magic happens as they cool on unbleached baking parchment, revealing their signature pale golden baked edges. Half of this stunning batch is elegantly flooded with a smooth, glossy pale pink royal icing. The other half shines with a crisp, stark white royal icing.
To finish them off, generous dustings of tiny red, pink, and white round sugar sprinkles cling perfectly to the wet icing. You’ll love the authentic, home-baked charm as a few loose sprinkles and buttery crumb fragments come to rest on the parchment paper below.
Why You’ll Love This Recipe
- Flawless Visual Appeal: By controlling your butter temperature and leavening, you’ll achieve cookies that are reliably flat with slightly puffy centers.
- Picture-Perfect Edges: The meticulous baking method guarantees crisp, pale golden baked edges that frame your royal icing beautifully.
- Professional Glossy Finish: The carefully balanced royal icing recipe dries to a stunning, glossy pale pink and stark white sheen.
- Satisfying Crunch: Tiny red, pink, and white round sugar sprinkles provide an irresistible textural contrast to the soft cookie crumb.
Ingredients & Substitutions

Every ingredient in these Valentine’s Day Sugar Cookies serves a specific culinary purpose. Precise measurements ensure your cookies retain their beautiful heart shapes without spreading.
Cookie Dough Foundations
Unsalted Butter: You need 1 cup (226g) of softened unsalted butter. Using unsalted butter allows you to control the exact sodium level, while the fat provides the tender, melt-in-your-mouth crumb.
Granulated Sugar: Use 1 cup (200g) of fine granulated sugar to aerate the butter. Creaming these together creates the necessary microscopic air pockets for a slightly puffy center.
Egg: 1 large egg acts as your primary binding agent. It provides moisture and structural integrity to the dough so your heart shapes won’t crumble.
Clear Vanilla Extract: 1 tsp (5ml) of clear vanilla extract adds warmth and depth. Using a clear extract ensures your dough stays relatively light in color.
All-Purpose Flour: You’ll need 3 cups (360g) of spooned and leveled all-purpose flour. This specific protein content gives the cookie enough chew without becoming tough.
Baking Powder: Exactly 1/2 tsp (2g) of baking powder provides a tiny amount of lift. This precise measurement is the secret to achieving slightly puffy centers without causing the edges to spread.
Kosher Salt: 1/2 tsp (3g) of kosher salt balances the intense sweetness of the icing. It enhances the rich, buttery notes of the baked dough.
Glossy Royal Icing & Decorations
Powdered Sugar: Use 4 cups (480g) of sifted powdered sugar for a lump-free base. Sifting is non-negotiable for a flawlessly smooth flood.
Meringue Powder: 3 tbsp (30g) of meringue powder stabilizes the icing. This is the magic ingredient that allows the icing to dry with a hard, glossy finish.
Warm Water: Approximately 1/3 cup (80ml) of warm water helps dissolve the sugar and thin the icing. You will add this slowly to reach the perfect flooding consistency.
Gel Food Coloring: You only need a single drop of pale pink gel food coloring. Gel is superior to liquid coloring because it won’t dilute your carefully balanced icing consistency.
Decorations: Prepare an assortment of red round sugar sprinkles, pink round sugar sprinkles, and white round sugar sprinkles. These tiny, hard spheres cling beautifully to wet icing and won’t bleed their colors quickly.
Equipment Needed
To execute this recipe with professional-level precision, you need the right tools. Ensure you have high-quality unbleached baking parchment; silicone mats can cause the cookies to spread too much, ruining your sharp heart shapes.
You will need standard 3-inch heart-shaped cookie cutters with sharp metal edges for clean cuts. Two piping bags fitted with small round tips (like Wilton size 2 or 3) are essential for achieving neat icing borders.
Finally, use a heavy-duty stand mixer or a reliable electric hand mixer to properly cream your butter and sugar. A sturdy rolling pin and rolling guides (or 1/4-inch dowels) will guarantee a perfectly even, flat dough thickness.
Step-by-Step Instructions

1. Prepare the Heart-Shaped Dough
In the bowl of your stand mixer, cream the softened butter and granulated sugar on medium-high speed for exactly 3 minutes. The mixture should become visibly lighter in color and fluffy in texture. Scrape down the sides of the bowl with a rubber spatula.
Add the egg and clear vanilla extract, mixing on medium speed until thoroughly combined. In a separate bowl, whisk together the all-purpose flour, baking powder, and salt.
Gradually add the dry ingredients to the wet ingredients in three batches, mixing on low speed just until the flour disappears. Stop the mixer immediately once the dough pulls away from the sides of the bowl; overmixing will develop gluten and make the cookies tough.
2. Roll and Chill for Structural Integrity
Divide the freshly made dough into two equal portions. Place one portion between two sheets of unbleached baking parchment.
Roll the dough out to an exact 1/4-inch thickness. Leaving the dough between the parchment layers, transfer it to a baking sheet and refrigerate for a minimum of 45 minutes.
Chilling the dough solidifies the butter, which is the ultimate culinary secret to preventing spreading in the oven. Once thoroughly chilled, remove the top layer of parchment and use your sharp heart-shaped cookie cutters to punch out the cookies.
3. Bake for Pale Golden Edges
Preheat your oven to 350°F (175°C). Carefully transfer your chilled heart cutouts to a fresh sheet of unbleached baking parchment set over a heavy-duty aluminum baking pan, leaving 2 inches of space between each cookie.
Bake the cookies on the center rack for 9 to 11 minutes. Watch them closely during the final two minutes; you want to pull them from the oven exactly when they develop pale golden baked edges.
The cookies will still look slightly puffy and underbaked in the center. Allow them to cool on the baking sheet for 5 minutes before transferring them to a wire rack to cool completely. As they cool, the centers will settle into a flat profile with just a hint of a soft, puffy dome.
4. Mix the Glossy Royal Icing
While the baked heart-shaped sugar cookies cool completely, prepare your icing. In a clean, grease-free mixing bowl, combine the sifted powdered sugar and meringue powder.
Add 1/4 cup of the warm water and a splash of clear vanilla extract. Beat on medium-low speed for 3-5 minutes until the icing becomes thick, smooth, and stark white.
To achieve flood consistency, slowly add the remaining warm water, one teaspoon at a time. Drag a butter knife through the icing; if the line disappears and the icing melts back into a smooth, glossy surface in exactly 10 to 12 seconds, it is ready.
5. Flood and Decorate with Sprinkles
Divide the stark white icing evenly into two bowls. Leave one bowl stark white, and tint the second bowl by folding in a small drop of pale pink gel food coloring until the color is fully uniform.
Transfer the icings into separate piping bags. Take your completely cooled cookies and carefully outline the heart shape, then immediately flood the center. Flood half of the cookies with the glossy pale pink royal icing, and the other half with the stark white royal icing.
Work with only two or three cookies at a time. While the icing is still visibly wet, apply generous dustings of tiny red, pink, and white round sugar sprinkles so they perfectly cling to the wet icing. Allow the cookies to set undisturbed for at least 8 hours so the icing can dry to a hard, glossy finish.
Expert Tips for Success
- Temperature is Everything: If your butter is too warm during the creaming stage, your cookies will bake into flat puddles. Ensure your butter is cool to the touch but leaves a slight indentation when pressed.
- The 10-Second Icing Rule: To achieve that flawlessly smooth, glossy royal icing, your flood consistency must be perfect. If the icing takes longer than 12 seconds to settle, it’s too thick; add a few drops of water.
- Embrace the Mess: Decorating on unbleached baking parchment makes cleanup easier. Let those loose sprinkles and crumb fragments rest on the parchment paper—it makes for a beautiful, rustic aesthetic!
- Weigh Your Flour: For the most consistent, tender crumb, use a digital kitchen scale. Scooping flour directly from the bag packs it down, resulting in dry, heavy cookies.
- Immediate Decoration: Royal icing forms a crust rapidly when exposed to air. Always apply your red, pink, and white round sugar sprinkles immediately after flooding so they sink slightly and adhere completely.
Storage & Reheating/Freezing
Once the glossy royal icing has completely hardened (usually after 8-12 hours), you can safely stack these Valentine’s Day Sugar Cookies. Place pieces of unbleached baking parchment between the layers to protect the glossy finish.
Store the decorated cookies in an airtight container at room temperature for up to two weeks. The icing acts as a seal, keeping the buttery cookie underneath incredibly soft and fresh.
If you want to freeze them, freeze the un-iced baked cookies in an airtight bag for up to 3 months. Thaw them completely at room temperature before applying your fresh royal icing and sprinkles.
What to Serve With This
A Romantic Dinner Menu
Creating a truly memorable Valentine’s Day requires more than just an incredible dessert. Kick off your romantic evening with sophisticated, savory appetizers like incredible garlic butter steak bites or crispy, tangy buffalo cauliflower bites.
For your main course, nothing says ‘I love you’ quite like a sizzling, rich marry me chicken recipe or a deeply flavorful homemade butter chicken. If you prefer elegant yet comforting meals, a beautifully cooked whole roasted chicken or a tender oven baked pork tenderloin will impress any guest.
Pair those fantastic main dishes with warm, cozy sides like savory fried cabbage and potatoes or zesty greek lemon potatoes. If Italian food is your ultimate love language, a hearty crockpot baked ziti or an authentic batch of the best italian meatballs will set the perfect stage for your sugar cookies.
Cozy Soups and Lighter Fare
If you prefer a lighter, cozier Valentine’s Day dinner, soup is always a fantastic choice. A simmering pot of crockpot chicken gnocchi soup or a rich, creamy pioneer woman potato soup offers incredible comfort.
For something healthy yet filling, serve up a mediterranean lentil soup or a vibrant black lentil mediterranean salad. You could also easily whip up a fresh, flaky sheet pan salmon paired with an upscale asparagus and gruyere quiche for a lovely brunch alternative.
More Sweets for a Valentine’s Dessert Board
Why stop at just one treat? Build a stunning, abundant Valentine’s Day dessert board! Contrast your sugar cookies with deep, rich cocoa flavors by serving chocolate raspberry truffles and decadent irish cream brownie cookies.
For a beautiful color palette, stack some crumbl copycat red velvet cookies and red velvet cake cookies next to your glossy pale pink hearts. Balance out the intense sweetness with bright, fruity treats like lemon blueberry mini cheesecakes or luscious strawberry cheesecake truffles.
Frequently Asked Questions
Yes! It is best to freeze the baked, undecorated cookies in an airtight container for up to 3 months. Let them thaw completely at room temperature before preparing and applying your glossy royal icing.
While silicone mats are non-stick, they insulate the bottom of the cookie and can sometimes encourage the dough to spread. For these cookies, unbleached baking parchment is highly recommended to achieve those perfect, slightly flat bases and crisp pale golden baked edges.
To prevent your cookies from losing their shape, always start with room-temperature butter (not melted or greasy) and measure your flour correctly. Most importantly, thoroughly chill the rolled dough for at least 45 minutes before baking. Cold butter in the oven is the secret to keeping sharp edges.
A dull finish typically happens when the icing is mixed too vigorously (creating trapped air), thinned out with too much water, or dried in a humid environment. Ensure you use meringue powder, achieve a 10-to-12-second flood consistency, and let them dry in a cool, well-ventilated space.
Royal icing forms a rapid crust when exposed to the air. If you wait even a few minutes after flooding the cookie, the icing will seal. You must apply your tiny round sugar sprinkles immediately after piping the flood layer so they can effectively cling to the wet icing.
Share the Love!
If you loved creating these beautiful, bakery-quality Valentine’s Day Sugar Cookies, please leave a comment and a 5-star rating below! We love hearing how your glossy pale pink and stark white royal icing turned out.
Don’t forget to subscribe to our newsletter for more incredible baking tips and seasonal treats. Pin this recipe to your favorite dessert boards so you always have the perfect romantic cookie recipe on hand!

Recipe Card
Valentine's Day Sugar Cookies
Ingredients
Equipment
Method
- In the bowl of your stand mixer, cream the softened butter and granulated sugar on medium-high speed for exactly 3 minutes until visibly lighter in color and fluffy.
- Scrape down the sides of the bowl. Add the egg and clear vanilla extract, mixing on medium speed until thoroughly combined.
- Whisk together the all-purpose flour, baking powder, and salt. Gradually add to the wet ingredients in three batches, mixing on low speed just until the flour disappears to avoid overmixing.
- Divide the dough into two equal portions. Place one portion between two sheets of unbleached baking parchment and roll to an exact 1/4-inch thickness.
- Refrigerate the rolled dough on a baking sheet for 45 minutes to solidify the butter. Remove the top parchment and use heart-shaped cookie cutters to punch out the cookies.
- Preheat oven to 350°F (175°C). Transfer cutouts to fresh unbleached baking parchment on a heavy-duty pan. Bake for 9-11 minutes until you see pale golden baked edges, leaving the centers slightly puffy. Cool completely on a wire rack.
- In a clean bowl, combine sifted powdered sugar and meringue powder. Add 1/4 cup warm water and beat on medium-low for 3-5 minutes until thick and stark white. Slowly add remaining water until a knife line disappears in 10-12 seconds.
- Divide the icing in half. Leave one half stark white. Tint the second half with a drop of pale pink gel food coloring. Transfer both to piping bags.
- Outline and flood half the cookies with pale pink royal icing, and the other half with white royal icing. Immediately apply generous dustings of tiny red, pink, and white round sugar sprinkles so they cling to the wet icing. Allow to dry for 8 hours.
Notes
Storage: Store dried, fully decorated cookies between layers of parchment paper in an airtight container for up to two weeks.