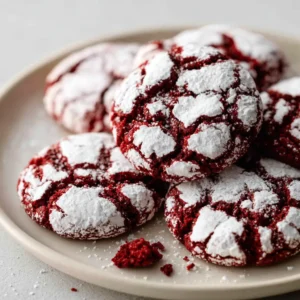
Red Velvet Cake Cookies are the ultimate indulgence for any dedicated dessert lover. If you have been searching for a cookie with a vibrant crimson red color and a slightly cracked, crinkled top surface, you are in the exact right place. These striking cookies deliver high bakery-level visual appeal straight from your home oven.
The magic of this recipe lies entirely within its texture. Breaking past the delicate, crinkled exterior reveals a dense, fudgy, moist interior crumb that melts instantly in your mouth. By balancing the subtle tang of vinegar with rich cocoa and a soft-baked technique, you achieve the authentic flavor profile of a classic red velvet cake in cookie form.
Whether you are serving these on a piece of crinkled parchment paper on a light neutral countertop for a beautifully rustic presentation, or boxing them up as holiday gifts, they never fail to impress. Soft natural daylight casting gentle shadows over their crinkled tops will have everyone reaching for a second cookie before they even take their first bite.
Why You’ll Love This Recipe
- Perfectly Thick & Soft-Baked: A carefully calibrated ratio of flour to melted butter ensures these cookies stand tall, avoiding the dreaded flat puddle effect.
- Vibrant Crimson Color: Professional-grade gel food coloring guarantees that deep, iconic red hue without thinning out the dough.
- Dense, Fudgy Crumb: Adding an extra egg yolk introduces essential fats that keep the interior moist and intensely rich.
- Crinkled Top Surface: The precise combination of baking soda and a high oven temperature forces the cookie to rapidly puff and crack, creating a gorgeous bakery-style exterior.
Ingredients & Substitutions
To achieve the exact visual and textural results of these thick, soft-baked deep red velvet cookies, you need the right foundational ingredients. Each element plays a scientifically vital role in the final structure.

All-Purpose Flour: 2 ¼ cups (280g) of standard all-purpose flour provides the essential structural backbone. Measure using the spoon-and-level method to avoid an overly dry crumb.
Unsweetened Cocoa Powder: ¼ cup (25g) of natural unsweetened cocoa powder brings the traditional hint of chocolate. Do not use Dutch-processed cocoa, as you need the natural acidity to react with the baking soda.
Baking Soda & Baking Powder: 1 tsp (6g) of baking soda and ½ tsp (2g) of baking powder work together for leavening. This specific duo gives the dough the rapid lift required to form those deep cracks on the surface.
Kosher Salt: ½ tsp (3g) of kosher salt enhances the chocolate notes. Salt is an invisible but critical ingredient for balancing the sweetness of the sugars.
Unsalted Butter: ½ cup (113g) of unsalted butter, melted and slightly cooled, guarantees a chewy texture. Using melted butter rather than creamed butter leads to a denser, fudgier center.
Light Brown Sugar & Granulated Sugar: ¾ cup (150g) of light brown sugar and ½ cup (100g) of granulated sugar offer the perfect ratio of moisture to crispness. The molasses in the brown sugar contributes heavily to the dense interior crumb.
Eggs: 1 large egg plus 1 additional egg yolk binds the dough. The extra yolk is the secret weapon for a rich, soft-baked center.
Red Gel Food Coloring: 1 tbsp (15g) of red gel food coloring yields that vibrant crimson red color. Gel is highly concentrated, meaning it won’t dilute your dough like liquid dyes.
White Vinegar & Vanilla Extract: 1 tsp (5ml) of white vinegar and 2 tsp (10ml) of pure vanilla extract provide the signature red velvet flavor profile. The vinegar reacts forcefully with the baking soda to tenderize the dough.
Equipment Needed
- Stand Mixer or Hand Mixer: Essential for properly beating the sugars, eggs, and food coloring into a smooth, vibrant emulsion.
- Heavy-Duty Baking Sheets: Light-colored aluminum baking sheets distribute heat evenly, preventing burnt bottoms.
- Parchment Paper: Crucial for preventing sticking and encouraging an even spread. Baking on a piece of crinkled parchment paper also offers a lovely rustic cooling surface.
- Large Cookie Scoop: A 3-tablespoon (approx. #20 size) spring-loaded scoop ensures perfectly uniform, thick cookies.
Step-by-Step Instructions
Follow these specific steps and sensory cues to ensure your cookies develop that coveted cracked, crinkled top surface and dense, fudgy interior crumb.
1. Whisk the Dry Ingredients
In a medium mixing bowl, vigorously whisk together the all-purpose flour, natural cocoa powder, baking soda, baking powder, and kosher salt. You want to see an even, light-brown powder with no clumps of cocoa remaining. This thorough distribution prevents uneven baking and ensures consistent lift across every cookie.
2. Combine the Wet Ingredients
In the bowl of a stand mixer fitted with the paddle attachment, pour in the melted, slightly cooled butter, light brown sugar, and granulated sugar. Beat on medium speed for about 2 minutes until the mixture looks like wet sand. Add the whole egg, the extra egg yolk, and the vanilla extract. Beat for another 2 minutes until the mixture becomes visibly paler and ribbons off the paddle.
3. Incorporate the Crimson Color
Stop the mixer and add the red gel food coloring and the white vinegar. Mix on low speed until the color is fully incorporated. You should see a highly vibrant crimson red color take over the bowl. Scrape down the sides and bottom of the bowl with a rubber spatula to ensure no streaks of uncolored butter remain trapped at the base.

4. Gently Fold the Dough
Pour the whisked dry ingredients into the vibrant red wet mixture. Turn your mixer to the lowest possible speed and mix just until the flour streaks disappear. Do not overmix, or you will activate the gluten and lose the tender, moist crumb. The dough will look thick, slightly sticky, and deeply red.
5. Chill the Cookie Dough
Cover the bowl tightly with plastic wrap and place it in the refrigerator for a minimum of 2 hours. This chilling phase is absolutely mandatory. It solidifies the melted butter, ensuring the cookies bake up thick rather than spreading into flat puddles. The flour also hydrates during this time, creating a denser texture.
6. Scoop and Bake
Preheat your oven to 350°F (175°C). Line two baking sheets with parchment paper. Using your large cookie scoop, portion the chilled dough into tall 3-tablespoon mounds. Roll them gently into spheres, but keep them tall rather than wide. Space them 3 inches apart on the baking sheet.
7. Achieve the Crinkled Surface
Bake on the center rack for 11 to 13 minutes. Watch for the visual cues: the edges should look firmly set, and the tops will have puffed up and formed a slightly cracked, crinkled top surface. The deep crevices will reveal a slightly underbaked, fudgy center. Remove from the oven immediately.
8. Cool and Set
Allow the cookies to cool directly on the hot baking sheet for 10 minutes. This carryover cooking gently finishes the dense, moist interior without drying it out. Transfer them to a wire rack, resting them on a piece of crinkled parchment paper on a light neutral countertop to cool completely.
Expert Tips for Success
- Do Not Flatten the Dough: When you place the chilled dough balls on the baking sheet, leave them as tall spheres. This structure forces the dough to collapse outward as it bakes, naturally creating those beautiful crinkled tops.
- Use Gel, Not Liquid: Liquid food dye requires much larger quantities to achieve a vibrant red, which adds unwanted liquid to your dough. High-quality gel coloring prevents this imbalance.
- Watch the Oven Closely: Red velvet is notoriously difficult to judge by color when baking. Rely on the physical structure—once the edges are set and the top shows a cracked surface, pull them out.
- Underbake Slightly for Fudginess: To guarantee a dense, fudgy, moist interior crumb, it is better to pull these from the oven 1 minute early rather than 1 minute late.
Storage & Freezing Instructions
Room Temperature: Store baked Red Velvet Cake Cookies in an airtight container at room temperature for up to 4 days. A slice of sandwich bread placed in the container will keep the interior crumb exceptionally moist.
Freezing Baked Cookies: Allow the cookies to cool completely. Layer them between sheets of parchment paper in a freezer-safe bag or container. They will keep for up to 3 months. Thaw at room temperature for 1 hour before serving.
Freezing Cookie Dough: Roll the chilled dough into balls and freeze them on a baking sheet for 1 hour until solid. Transfer to a freezer bag for up to 3 months. You can bake them straight from frozen, simply adding 2-3 extra minutes to the baking time.
What to Serve With This
These striking, rich cookies are the perfect dramatic finale to a comforting dinner. After serving a savory main course like our best italian meatballs, a hearty bowl of crockpot chicken gnocchi soup, or a classic crockpot lasagna, these vibrant cookies provide the perfect sweet contrast.
If you are planning an elaborate holiday dessert board or a Valentine’s Day spread, pair these Red Velvet Cake Cookies with our adorable valentine s day sugar cookies and elegant chocolate raspberry truffles. For a true red velvet overload, serve them right alongside our crumbl copycat red velvet cookies and the powdered-sugar-coated red velvet crinkle cookies.
Looking for a complementary texture? Serve a warm cookie with a generous scoop of strawberry cottage cheese ice cream. If you’re building a colorful cookie tin to gift to neighbors, mix these crimson beauties with our lemon blueberry cheesecake cookies, rich irish cream brownie cookies, and sweet blueberry white chocolate cookies. No matter the occasion, their soft-baked, fudgy centers will steal the show.
Frequently Asked Questions
While you can, gel food coloring is highly recommended. You only need a small amount of gel to achieve a vibrant crimson red color, whereas liquid coloring requires much more volume and can make the dough too wet.
Roll your chilled dough into tall spheres rather than flattening them. Baking them at 350°F allows the exterior to set quickly while the fudgy center expands, creating that beautiful cracked surface.
Look for the edges to be firm and set, while the tops have puffed and cracked. The deep crevices will still look slightly moist. They will continue to bake on the hot baking sheet once removed from the oven.
True red velvet flavor comes from the interaction between natural unsweetened cocoa powder, a splash of white vinegar, and vanilla extract. This combination produces a subtle chocolate flavor with a signature tender tang.
Spreading usually happens if the butter was too warm or if you skipped the mandatory 2-hour chilling phase. Cold dough is essential for thick, soft-baked cookies.
Closing Thoughts & Next Steps
There is nothing quite like biting into a soft-baked cookie that delivers perfectly crisp edges and a deeply fudgy, moist center. These Red Velvet Cake Cookies are an absolute triumph in both texture and visual appeal.
If you successfully baked a batch with a vibrant crimson red color and a gorgeous, crinkled top, please leave a comment and a 5-star rating below! Don’t forget to subscribe to our newsletter for more bakery-style recipes sent straight to your inbox, and be sure to pin this recipe to your dessert boards for later!
Recipe Schema
Thick and Fudgy Red Velvet Cake Cookies
Ingredients
Equipment
Method
- In a medium mixing bowl, vigorously whisk together the all-purpose flour, natural cocoa powder, baking soda, baking powder, and kosher salt until fully combined with no cocoa clumps.
- In the bowl of a stand mixer, beat the melted, slightly cooled butter, light brown sugar, and granulated sugar on medium speed for 2 minutes. Add the whole egg, extra egg yolk, and vanilla extract. Beat for another 2 minutes until pale and ribbon-like.
- Add the red gel food coloring and white vinegar. Mix on low speed until a vibrant crimson red color is fully incorporated. Scrape down the sides of the bowl.
- Pour the dry ingredients into the wet mixture. Mix on the lowest speed just until the flour streaks disappear to maintain a tender crumb.
- Cover the bowl tightly with plastic wrap and chill in the refrigerator for at least 2 hours to prevent spreading during baking.
- Preheat your oven to 350°F (175°C). Line two baking sheets with parchment paper.
- Using a 3-tablespoon cookie scoop, portion the chilled dough into tall mounds. Space them 3 inches apart on the baking sheets.
- Bake for 11 to 13 minutes until the edges are set and the tops show a slightly cracked, crinkled surface with a fudgy center.
- Allow the cookies to cool directly on the hot baking sheet for 10 minutes before transferring them to a wire rack to cool completely.
Notes
Tip 2: Do not skip chilling the dough, as this guarantees thick, soft-baked cookies instead of flat puddles.