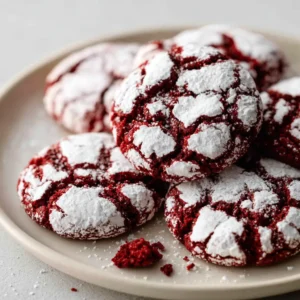
There is something inherently magical about pulling a fresh batch of Red Velvet Crinkle Cookies out of the oven. The visual appeal alone is enough to make anyone’s mouth water. When you gaze at a close-up view of these freshly baked beauties resting on a light-colored ceramic plate, the contrast is absolutely striking. You are immediately drawn to the thick, stark white layer of fine powdered sugar that heavily coats the exterior.
As you look closer, that pristine white coating breaks apart to reveal a deep crimson-red, soft, and fudgy interior. This vibrant red dough is clearly visible through the prominent, irregular cracks that organically form across the surface during the baking process. It is a masterpiece of culinary science and visual design, combining rich textures with a deeply satisfying flavor profile.
Whether you are baking for a holiday, a special Valentine’s Day treat, or simply indulging a weekend craving, these cookies deliver on every front. The delicate dustings of powdered sugar and loose crumbs of baked red dough scattered naturally around the plate tell the story of a perfectly executed recipe. Let’s dive into the precise culinary steps required to recreate this exact, visually stunning, and mouth-watering dessert in your own kitchen.
Why You’ll Love This Recipe
- Striking Visual Contrast: The heavy, stark white powdered sugar layer provides an incredibly photogenic contrast against the dark red crevices of the cookie.
- Fudgy, Brownie-Like Texture: Thanks to a scientifically balanced ratio of brown sugar to butter, the interior remains deeply soft, moist, and delightfully fudgy.
- Prominent, Irregular Cracks: By properly chilling the dough, we ensure the exterior sets quickly in the oven while the interior expands, creating beautifully rustic, deep fissures.
- Authentic Red Velvet Flavor: A precise touch of unsweetened natural cocoa powder combined with vanilla delivers that signature, earthy red velvet tang, rather than just tasting like dyed vanilla dough.
- Foolproof Coating: We utilize a professional culinary trick—rolling the dough in granulated sugar before the powdered sugar—to guarantee the white coating never melts or disappears during baking.
Ingredients & Substitutions

The Dry Ingredients
1 1/2 cups (190g) All-Purpose Flour: This provides the essential structural foundation for the cookies. Measuring your flour precisely ensures the dough is sturdy enough to roll, but delicate enough to remain soft and fudgy on the inside.
1/4 cup (25g) Unsweetened Natural Cocoa Powder: Cocoa is the invisible flavor backbone of any true red velvet recipe. It imparts a subtle chocolate note and reacts with the wet ingredients to deepen the rich, crimson-red hue.
1 tsp (4g) Baking Powder: This is a crucial leavening agent responsible for the cookie’s rise. As the cookie puffs up in the oven, the baking powder forces the set exterior to tear, creating those prominent, irregular cracks.
1/4 tsp (1g) Baking Soda: Baking soda works in tandem with the baking powder to provide a rapid, initial lift. It also aids in tenderizing the crumb, guaranteeing that the interior remains undeniably soft.
1/2 tsp (3g) Fine Sea Salt: Salt is a foundational ingredient that enhances the perception of sweetness. It balances the sugars and amplifies the rich vanilla and cocoa flavor profiles.
The Wet Ingredients
1/2 cup (115g) Unsalted Butter, Softened: Butter provides the necessary fat for a tender, melt-in-your-mouth texture. Using unsalted butter allows you to perfectly control the sodium content of the dough.
1/2 cup (100g) Granulated Sugar: Granulated sugar contributes to the crispness of the cookie’s outer edges. It helps create a slightly firm exterior shell that contrasts beautifully with the soft center.
1/2 cup (100g) Packed Light Brown Sugar: The molasses in the brown sugar is the secret to a genuinely fudgy interior. It retains moisture during the baking process, keeping the deep red center incredibly soft.
1 Large Egg (50g), Room Temperature: The egg acts as the primary binder, emulsifying the fats and liquids. A room-temperature egg blends much more smoothly into the butter and sugars, preventing the batter from breaking.
1 tbsp (15ml) Milk: A tiny splash of milk provides just enough hydration to bring the dough together without making it cakey. You can substitute this with buttermilk for an even more authentic red velvet tang.
2 tsp (10ml) Pure Vanilla Extract: Vanilla elevates all the surrounding flavors in the dough. It is absolutely essential for achieving that classic, bakery-style red velvet aroma.
1 tbsp (15ml) Liquid Red Food Coloring: This is what gives the cookies their signature deep crimson-red appearance. If you prefer to use concentrated gel food coloring, use exactly 1 tsp (5g) instead.
The Coating
1/4 cup (50g) Granulated Sugar: Rolling the raw dough balls in granulated sugar first is a mandatory culinary technique. It creates a moisture barrier that prevents the powdered sugar from being absorbed into the wet dough.
1 cup (120g) Fine Powdered Sugar: Also known as confectioners’ sugar, this creates the thick, stark white exterior layer. Be incredibly generous when rolling to ensure the dark red crevices visually pop against the bright white surface.
Equipment Needed
To achieve forensic visual accuracy and perfect textures, you will need a few standard kitchen tools. First, grab a medium mixing bowl and a wire whisk for properly aerating your dry ingredients. You will also need a large mixing bowl and an electric hand mixer (or a stand mixer fitted with a paddle attachment) to cream the butter and sugars effectively.
For portioning the dough, a medium 1.5-tablespoon cookie scoop is highly recommended to ensure uniform size and even baking. You will also need two large, light-colored aluminum baking sheets. Always line your baking sheets with unbleached parchment paper or a silicone baking mat to prevent sticking and to protect the delicate bottoms of the cookies from over-browning.
Step-by-Step Instructions

Step 1: Whisk the Dry Ingredients
In a medium mixing bowl, combine 1 1/2 cups (190g) all-purpose flour, 1/4 cup (25g) unsweetened natural cocoa powder, 1 tsp (4g) baking powder, 1/4 tsp (1g) baking soda, and 1/2 tsp (3g) fine sea salt. Whisk these ingredients vigorously for about 30 seconds.
Sensory Cue: You are looking for a uniform, light brown mixture with no visible lumps of cocoa powder. You should faintly smell the dry, earthy aroma of the cocoa.
Step 2: Cream the Butter and Sugars
In a large mixing bowl, add the 1/2 cup (115g) softened unsalted butter, 1/2 cup (100g) granulated sugar, and 1/2 cup (100g) packed light brown sugar. Beat on medium-high speed for 2 to 3 minutes until the mixture is pale, light, and visibly fluffy.
Sensory Cue: The mixture will increase in volume and look like wet, aerated sand. Scrape down the sides of the bowl with a rubber spatula to ensure everything is evenly incorporated.
Step 3: Incorporate the Wet Ingredients
To the creamed butter mixture, add the 1 large egg (50g), 1 tbsp (15ml) milk, and 2 tsp (10ml) pure vanilla extract. Beat on medium speed until just combined. Next, carefully pour in the 1 tbsp (15ml) liquid red food coloring.
Sensory Cue: As you blend in the coloring, the batter will rapidly transform into a striking, deep crimson-red paste. The aroma of rich vanilla will become very pronounced.
Step 4: Blend the Dough
Pour the whisked dry ingredients into the bowl with the wet red velvet mixture. Turn your mixer to the lowest possible speed and mix only until the dry streaks of flour completely disappear.
Sensory Cue: The dough will be incredibly thick, sticky, and visually resemble deep red, wet clay. Do not overmix, as this will activate the gluten and ruin the fudgy interior texture.
Step 5: Chill the Cookie Dough
Cover the bowl tightly with plastic wrap and place it in the refrigerator for a minimum of 2 hours. This is a non-negotiable step. Chilling solidifies the butter, allowing the cookies to bake thick and intensely fudgy rather than spreading into thin puddles.
Sensory Cue: After 2 hours, the dough should feel firm to the touch and easily scoopable without sticking excessively to your fingers.
Step 6: The Double Sugar Roll
Preheat your oven to 350°F (175°C) and line two large baking sheets with parchment paper. Place 1/4 cup (50g) granulated sugar in one small, shallow bowl, and 1 cup (120g) powdered sugar in a second shallow bowl. Scoop the chilled dough into 1.5-tablespoon-sized balls.
Sensory Cue: Roll each dough ball thoroughly in the granulated sugar until completely coated, then roll it heavily in the stark white powdered sugar. The dough balls should look like miniature snowballs with absolutely no red dough visible through the thick white layer.
Step 7: Bake and Cool
Place the heavily coated dough balls onto the prepared baking sheets, spacing them about 2 inches (5cm) apart. Bake on the middle rack of the preheated oven for 11 to 13 minutes.
Sensory Cue: At the 10-minute mark, you will visibly see prominent, irregular cracks forming across the surface, exposing the dark red, soft interior. The edges should be set, but the centers will still look slightly underbaked. Remove from the oven and let them rest on the hot baking sheet for 5 minutes before transferring to a wire rack. Loose crumbs of baked red dough and delicate dustings of powdered sugar may scatter on the parchment, adding to the visual charm.
Expert Tips for Success
- Spoon and Level Your Flour: Never scoop flour directly from the bag with your measuring cup, as this packs the flour and leads to dry, crumbly cookies. Always spoon the flour into the cup and level it off with a straight edge to ensure accurate 190g measurements.
- The Granulated Sugar Barrier: Do not skip rolling the dough in granulated sugar before the powdered sugar. The granulated sugar absorbs the dough’s exterior moisture, acting as a shield so the stark white powdered sugar remains vividly white and thick during baking.
- Strict Chilling Time: If you attempt to bake the dough at room temperature, the cookies will spread completely flat, and the essential prominent, irregular cracks will not form. Two hours of chilling is the absolute minimum for structural success.
- Do Not Overbake: For that truly soft and fudgy interior, you must pull the cookies from the oven while the centers still look slightly soft and underdone. The residual heat from the baking sheet will finish cooking them to perfection as they cool.
- Gel vs. Liquid Coloring: While the recipe calls for liquid coloring, gel coloring (like Americolor Super Red) is highly recommended by professionals. It provides a more vibrant, deep crimson-red hue without adding unnecessary liquid to the batter.
Storage & Reheating/Freezing
To keep your Red Velvet Crinkle Cookies soft and incredibly fudgy, store them in an airtight container at room temperature for up to 5 days. Layer the cookies between sheets of parchment paper to prevent the stark white powdered sugar coating from becoming smudged by the loose crumbs of baked red dough.
If you want to prepare these in advance, the unbaked cookie dough balls can be frozen. Scoop the dough, freeze the bare balls on a baking sheet until solid, and then transfer them to a freezer-safe zip-top bag for up to 3 months. When you are ready to bake, let the dough balls sit at room temperature for 30 minutes, perform the double sugar roll, and add an extra minute or two to the baking time.
What to Serve With This
Planning a multi-course dinner party or a cozy weekend feast? These visually stunning cookies serve as the absolute perfect sweet finale to a savory meal. If you are hosting a comforting Italian night, start your guests off with a robust appetizer like our best-italian-meatballs. Follow it up with a hearty, cheesy main course such as crockpot-baked-ziti or our incredibly popular crockpot-lasagna. The rich cocoa and vanilla notes of these red velvet cookies beautifully balance the acidity of tomato-based dishes.
During the colder months, there is nothing better than serving a decadent dessert after a soul-warming bowl of soup. Pair these crinkle cookies with our creamy crockpot-chicken-gnocchi-soup, a classic lentil-vegetable-soup, or a hearty helping of authentic-louisiana-red-beans-and-rice. The contrast between a savory, savory dinner and a strikingly sweet, fudgy dessert is truly unmatched.
If you are building an epic holiday dessert platter or a Valentine’s Day spread, variety is key. Arrange these deep crimson-red cookies on a light-colored ceramic plate right alongside our valentine-s-day-sugar-cookies, red-velvet-cake-cookies, and a batch of our rich irish-cream-brownie-cookies. To add a fruity contrast to the dessert table, throw in a batch of blueberry-white-chocolate-cookies or some elegant chocolate-raspberry-truffles.
Finally, if you just want an afternoon snack, these cookies pair exquisitely with a cold glass of milk, a hot cup of coffee, or even a side of our sweet strawberry-cottage-cheese-ice-cream for a fun twist on an ice cream sandwich.
Frequently Asked Questions
Yes! You can freeze the bare, unrolled cookie dough balls in an airtight container for up to 3 months. Let them sit at room temperature for 30 minutes before doing the double sugar roll and baking.
You can use either! This recipe calls for 1 tablespoon of liquid red food coloring. However, using 1 teaspoon of concentrated gel coloring is highly recommended by professionals for an even deeper, more vibrant crimson-red hue without adding extra liquid.
Dry cookies are the result of overmeasuring the flour or overbaking. Always spoon and level your flour (or use a kitchen scale to measure 190g), and pull the cookies from the oven while the centers still look slightly soft and underdone.
If your powdered sugar disappeared during baking, you likely skipped rolling the dough in granulated sugar first. The granulated sugar acts as a protective moisture barrier, stopping the wet dough from absorbing the fine powdered sugar.
Lack of crinkling usually happens if the dough wasn’t chilled long enough or your baking powder is expired. The dough must be cold so the exterior sets quickly in the hot oven while the interior expands, forcing the surface to crack.
Recipe Card
Red Velvet Crinkle Cookies: The Ultimate Fudgy Recipe
Ingredients
Equipment
Method
- In a medium mixing bowl, whisk together the flour, cocoa powder, baking powder, baking soda, and salt until completely uniform with no visible lumps.
- In a large mixing bowl, beat the softened butter, 1/2 cup granulated sugar, and brown sugar on medium-high speed for 2 to 3 minutes until pale, fluffy, and aerated.
- Add the egg, milk, and vanilla extract to the butter mixture. Beat until combined, then blend in the red food coloring until the batter is a striking, deep crimson-red paste.
- Pour the whisked dry ingredients into the wet mixture. Mix on low speed strictly until the dry streaks of flour disappear. The dough will be very sticky and thick.
- Cover the bowl tightly with plastic wrap and refrigerate for a minimum of 2 hours. This is essential for achieving thick cookies and prominent cracks.
- Preheat oven to 350°F (175°C). Scoop the chilled dough into 1.5-tablespoon balls. Roll each ball completely in the small bowl of granulated sugar, then roll generously in the bowl of powdered sugar until coated in a stark white layer.
- Place heavily coated dough balls on parchment-lined baking sheets 2 inches apart. Bake for 11 to 13 minutes until prominent cracks form and the edges set, but the interior remains soft. Cool on the pan for 5 minutes before moving to a wire rack.
Notes
Do not skip the first roll in granulated sugar; it prevents the powdered sugar from dissolving into the dough.
Closing & Subscribe
Thank you for trying our Ultimate Fudgy Red Velvet Crinkle Cookies! If you achieved those beautiful, prominent irregular cracks and that deep crimson-red fudgy interior, we would love to hear about it. Please leave a comment and a 5-star rating below to let us know how your baking adventure turned out.
Don’t forget to subscribe to our newsletter for more weekly culinary inspiration delivered straight to your inbox. For more step-by-step visual guides and recipe blueprints, follow us on Pinterest and pin the image below to your favorite dessert boards!