There is a common misconception that healthy baking must compromise on texture, but these Protein Brownies completely shatter that rule. Inspired by the desire for a dense, bakery-style treat without the sugar crash, this recipe delivers an intensely dark chocolate experience. When you pull these from the oven, you will immediately notice the signature slightly crinkled, matte top surface that every authentic brownie demands. The secret lies in a specific culinary technique, balancing rich cocoa with the structural integrity needed to support a towering stack of fudge-like squares.
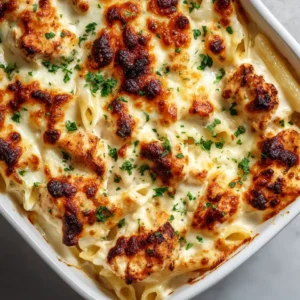
Every element of these Protein Brownies has been engineered for maximum sensory pleasure. From the thin drizzle of melted dark chocolate zigzagging across the top to the perfect sprinkle of coarse white sea salt flakes, the visual appeal matches the incredible flavor profile. They possess a dense, moist, and deeply fudgy texture that holds up beautifully, whether you are stacking them for a stunning presentation or sneaking a quick bite out of the back corner. Prepare to transform your approach to high-protein desserts.

Why These Fudgy Chocolate Squares Reign Supreme
Creating the ultimate macro-friendly dessert requires more than simply tossing whey powder into a bowl. These Protein Brownies stand out because they utilize professional culinary science to mimic traditional high-fat baking. Here is what makes this specific formulation absolutely foolproof:
- Unmatched Fudgy Texture: By relying on a precise ratio of melted fats to dry ingredients, we avoid the dreaded “cakey” or rubbery texture often associated with fitness desserts.
- Signature Crinkle Top: Vigorously whipping the eggs and sweetener creates a delicate meringue-like skin, resulting in that beautiful, matte, paper-thin crust.
- Deep Flavor Profile: A combination of high-quality dark cocoa and espresso powder amplifies the chocolate notes, ensuring a rich, decadent bite every single time.
- Visual Masterpiece: The finishing touches—a precise dark chocolate zigzag drizzle and scattered coarse sea salt flakes—provide bakery-level aesthetics and a perfect sweet-salty balance.
The Essential Building Blocks for Dense Chocolate Squares
To achieve the structural integrity required for an offset stack of beautifully cut squares, your ingredients must be perfectly balanced. Each component plays a vital role in the final chemistry of these Protein Brownies.
The Foundational Wet Ingredients
1/2 cup (113g) Unsalted Butter, Melted: Butter provides the necessary fat content to keep the crumb tightly packed and moist. Melting the butter before mixing ensures a denser, chewier bite rather than a fluffy cake-like rise.
1/2 cup (100g) Granulated Monk Fruit Sweetener: Using a 1:1 sugar substitute keeps the calories low while providing the crucial granular structure needed for aerating the eggs. If you prefer, standard granulated sugar works exactly the same for that iconic crinkled top.
2 Large Eggs, Room Temperature: Eggs act as the primary binder, providing moisture and structure. Room temperature eggs emulsify seamlessly with the melted butter, preventing the batter from seizing or splitting.
1 tsp (5ml) Pure Vanilla Extract: Vanilla acts as a flavor enhancer for chocolate, rounding out the bitter notes of the cocoa. It provides a warm, aromatic background that makes the dark chocolate taste even richer.
The Dry Textural Components
1/2 cup (60g) Unsweetened Dark Cocoa Powder: A high-fat, Dutch-processed dark cocoa powder is non-negotiable for achieving that midnight-dark color and intense flavor. It absorbs liquids effectively, contributing to the thick, fudgy batter.
1/2 cup (50g) Chocolate Whey Protein Powder: Whey isolate works best here, acting as both a flavor booster and the primary protein source. Because whey can dry out baked goods, we keep the flour ratio incredibly low to compensate.
1/4 cup (30g) All-Purpose Flour: A minimal amount of gluten is required to hold the heavy, wet ingredients together so the squares can be stacked. You can substitute oat flour if you prefer a gluten-free approach, though the crumb will be slightly more fragile.
1/4 tsp (1g) Fine Sea Salt: Invisible but essential, fine salt enhances the sweetness and suppresses any artificial notes from the whey powder. It is the silent workhorse of all professional baking.
The Visual Finishing Elements
2 tbsp (30g) Dark Chocolate Chips: Melted down until smooth, these create the precise, thin zigzag drizzle across the matte surface. A tiny drop of coconut oil can be added to help the chocolate flow beautifully from a piping bag.
1 tsp (3g) Coarse White Sea Salt Flakes: Scattered over the wet chocolate drizzle, these flaky crystals provide a sudden, sharp burst of salinity. They contrast visually against the dark top and cut through the richness of the fudge.

Baking Arsenal for the Perfect Brownie Crinkle
You do not need an industrial kitchen to master these Protein Brownies, but a few specific tools will guarantee an unedited, magazine-worthy result. Proper heat conduction is the secret to baking evenly.
First, a light-colored 8×8-inch metal baking pan is highly recommended. Dark pans absorb too much heat and will overbake the edges, ruining the uniform moisture of the stack. Second, parchment paper is an absolute necessity. Leaving a two-inch overhang allows you to lift the entire slab out of the pan, ensuring razor-sharp edges when cutting.
Finally, a sturdy balloon whisk and a fine-mesh sieve are crucial. The whisk is needed to aggressively beat the eggs and sweetener together until pale and ribbon-like. The sieve ensures your cocoa and whey powder are entirely lump-free, keeping the batter flawlessly smooth and dense.
Blueprint for the Ultimate Fudgy Bake
Follow these precise culinary instructions to recreate the exact textures and visual cues described in our master blueprint. Pay close attention to the sensory indicators provided.
Preparing the Pan and Oven
Begin by preheating your oven to 325°F (165°C). A slightly lower baking temperature ensures the edges do not dry out before the center has time to set. Line an 8×8-inch baking pan with parchment paper, allowing the edges to hang over the sides for easy removal.
Lightly mist the exposed parchment with a neutral cooking spray. This guarantees the sticky, fudge-like edges release cleanly, preserving the perfect geometry needed for stacking.
Creating the Glossy Emulsion
In a large mixing bowl, combine the melted unsalted butter and the granulated monk fruit sweetener. Whisk vigorously for about 60 seconds until the mixture looks slightly granular but cohesive. The bowl should feel warm to the touch.
Add the room temperature eggs one at a time, followed by the vanilla extract. Whisk aggressively for 2 to 3 minutes. The visual cue here is crucial: the mixture must transition from a dark, oily liquid to a pale, thick, and highly glossy emulsion. This aeration is what forces the top surface to become perfectly crinkled and matte upon baking.
Folding in the Dry Matrix
Place a fine-mesh sieve over your bowl of wet ingredients. Add the dark cocoa powder, chocolate whey protein, all-purpose flour, and fine sea salt into the sieve. Gently shake the dry ingredients through the mesh, discarding any hard lumps of protein powder.
Switch to a rubber spatula and begin gently folding the dry mixture into the wet emulsion. Scrape the bottom and sides of the bowl in wide, circular motions. Stop folding the exact moment the last streak of flour disappears. Overmixing will develop the gluten and result in a tough, rubbery texture rather than a moist, tender bite.
Baking for Peak Moisture
Pour the thick batter into your prepared baking pan. Use an offset spatula to push the batter into the corners, smoothing the top surface into an even, flat layer. The batter should feel heavy and dense.
Bake on the center rack for 18 to 22 minutes. You are looking for a specific visual cue: the top should look completely matte and slightly crinkled, but the center will still have a slight jiggle. A toothpick inserted into the middle should come out with thick, moist crumbs attached, not clean. Do not overbake.
Executing the Visual Finish
Allow the slab to cool completely in the pan for at least one hour. This resting period is when the residual heat finishes setting the center, locking in the fudgy density. Once cool, use the parchment overhang to lift the slab onto a neutral, off-white cutting board.
Melt the dark chocolate chips in the microwave in 15-second intervals, stirring until completely smooth. Transfer to a small zip-top bag and snip a tiny corner off. Zigzag a thin drizzle of the melted dark chocolate rapidly across the entire surface of the cut squares. Immediately scatter the coarse white sea salt flakes over the top so they adhere to the wet chocolate drizzle.
Pro Secrets for a Moist, Bakery-Style Texture
Even with a flawless recipe, small variations in technique can alter the outcome. Keep these expert tips in mind to ensure your Protein Brownies are a resounding success.
- Sift Your Protein: Whey powder is notorious for clumping. Skipping the sifting step will leave unappetizing, chalky white pockets of dry powder inside your moist squares.
- Watch the Clock: Because of the high protein content, these go from fudgy to dry in a matter of two minutes. Always err on the side of underbaking; they will continue to firm up as they cool on the counter.
- The Perfect Cut: For clean, sharp edges that look professionally photographed, run a large chef’s knife under hot water, wipe it completely dry, and press straight down into the chilled slab without sawing.
- Protein Powder Variations: This recipe was developed using a whey-casein blend or pure whey isolate. Plant-based proteins absorb significantly more liquid; if using vegan protein, increase the melted butter by 2 tbsp (30ml) to maintain the dense moisture.
Keeping Your Chocolate Bakes Fresh and Fudgy
Because these treats are so incredibly moist, proper storage is essential to maintain their dense texture. Air is the enemy of baked goods, especially those containing whey protein.
Place the completely cooled and drizzled squares into an airtight container. They will keep perfectly fresh on the kitchen counter at room temperature for up to 3 days. For a denser, chewier experience, store them in the refrigerator for up to a week; the chilled butter content tightens the crumb, making them taste remarkably like a cold fudge bar.
To freeze, wrap each individual square tightly in plastic wrap, then place them inside a heavy-duty freezer bag. They freeze beautifully for up to 3 months. When the craving strikes, let one sit at room temperature for 30 minutes, or microwave it for 15 seconds to instantly restore the melted chocolate aroma.
What to Serve Alongside Your Chocolate Treat
While a stack of these rich chocolate squares is a showstopper on its own, pairing them strategically can elevate your entire dessert or snack experience. Balance the deep cocoa flavor with lighter, complimentary textures.
If you are hosting a high-protein brunch, serve these as a sweet finale alongside savory staples. A slice pairs beautifully with the creamy, satisfying textures of a peanut butter brownie cups platter for the ultimate chocolate lover’s spread. Alternatively, contrast the dense fudge with a lighter, fruit-forward option like a slice of moist protein banana bread.
For an elaborate dessert table, arrange these squares next to a visually stunning healthy chocolate cake recipe. The contrasting heights and textures create a bakery-worthy display. If you are prepping snacks for the week, alternate these with fruity, chewy strawberry oatmeal bars to give yourself a varied selection of macro-friendly treats.
Common Questions About Baking With Whey
While you can omit the flour, it acts as a crucial binder that provides structural integrity. If you remove it, the brownies will be very fragile and difficult to stack. Almond flour is a great low-carb substitute.
Yes, but plant-based proteins absorb significantly more moisture than whey. You will need to add an additional 2 tablespoons of melted butter or a splash of almond milk to prevent the batter from becoming too dry.
No, you can substitute the monk fruit sweetener with an equal amount of standard granulated sugar or coconut sugar. Just note that altering the sweetener will change the overall macro profile.
The signature crinkled top is created by vigorously whisking warm melted butter, sweetener, and room-temperature eggs together until the mixture forms a pale, thick, and glossy emulsion before adding the dry ingredients.
A cakey texture is usually the result of overmixing the batter, which develops the gluten in the flour, or overbaking. Ensure you fold the dry ingredients gently and remove the pan from the oven while the center still has a slight jiggle.
The Ultimate Dark Chocolate Protein Bake
It is time to execute the master blueprint. Gather your ingredients, prepare your whisk, and get ready to experience the most decadent, macro-friendly dessert you have ever created. Remember to watch for that glossy batter and matte finish!
Protein Brownies: Fudgy Dark Chocolate Squares with Sea Salt
Ingredients
Equipment
Method
- Preheat the oven to 325°F (165°C). Line an 8x8-inch metal baking pan with parchment paper, leaving an overhang. Lightly mist with cooking spray.
- In a large bowl, vigorously whisk the melted butter and monk fruit sweetener for 60 seconds. Add the room temperature eggs and vanilla extract. Whisk aggressively for 2-3 minutes until the mixture transforms into a pale, thick, and highly glossy emulsion.
- Place a fine-mesh sieve over the wet mixture. Sift in the dark cocoa powder, chocolate whey protein, flour, and fine sea salt. Use a rubber spatula to gently fold the dry ingredients into the wet until just combined. Do not overmix.
- Pour the dense batter into the prepared pan and smooth the top. Bake for 18-22 minutes. The top should appear matte and crinkled, while a toothpick inserted into the center should come out with thick, moist crumbs.
- Let cool completely in the pan for at least 1 hour. Lift out using the parchment overhang and cut into squares. Melt the dark chocolate chips, zigzag the chocolate over the cut squares, and immediately sprinkle with coarse white sea salt flakes.
Notes
Tip 2: Undercooking slightly by 1-2 minutes guarantees a fudgier center as the brownies will set while cooling.

Ready to Bake? Pin This For Later!
Once you experience the fudgy center and the satisfying crunch of coarse sea salt, these Protein Brownies will become a permanent fixture in your weekly meal prep. The combination of dense chocolate, a beautiful matte crinkle top, and an elegant zigzag drizzle proves that nutritional goals and culinary indulgence can peacefully coexist.
Did you achieve the perfect stack? We want to see your offset, beautifully lit handheld smartphone photos! Leave a rating in the recipe card above, let us know how your crinkle top turned out in the comments, and do not forget to share your success on Pinterest. Happy baking!