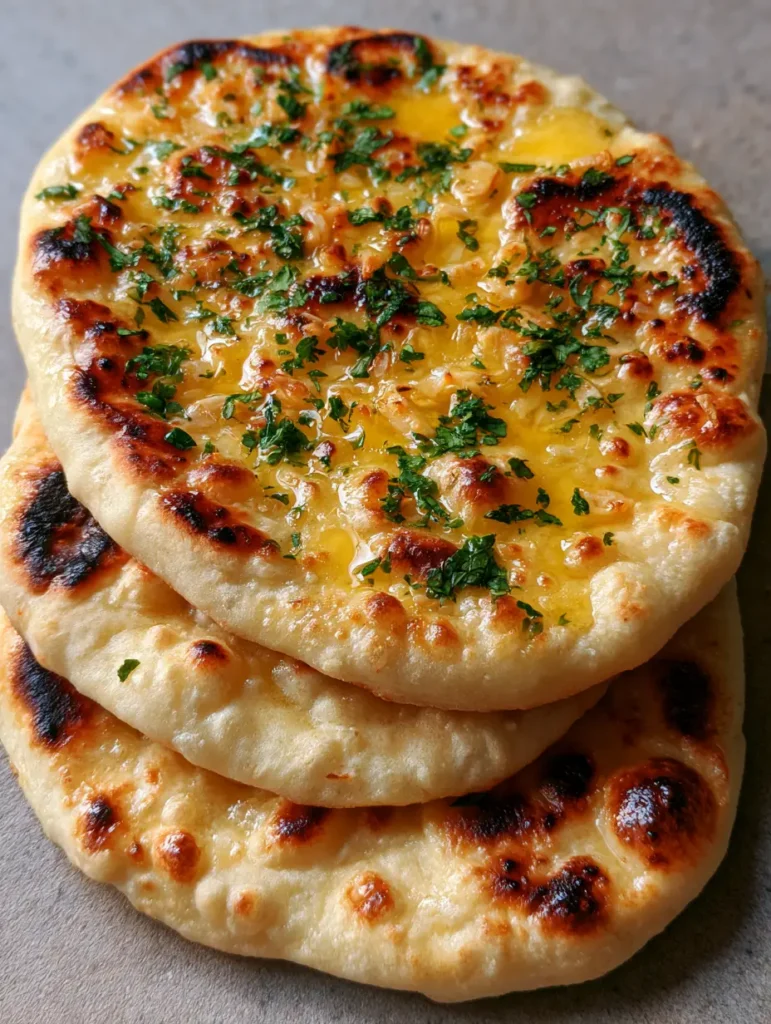
There is nothing quite like the sensory experience of a fresh Garlic Naan Bread Recipe hitting the table, still steaming and glistening under a pool of melted garlic butter. If you have ever marveled at those distinct golden-brown charred bubbles and that soft, bubbly, leavened texture at your favorite Indian restaurant, you are in the right place. We are going to recreate that exact handheld smartphone photo aesthetic: a stack of three oval-shaped breads, heavily brushed with a glossy glaze and speckled with vibrant green cilantro.
Making a Garlic Naan Bread Recipe at home might seem intimidating if you don’t own a clay tandoor oven, but the secret lies in the science of the skillet. By using high, dry heat and a perfectly hydrated dough, we can achieve that characteristic irregular edge and thick, pillowy center. This recipe is designed for the enthusiastic home cook who wants professional results using standard kitchen tools.
Why This Is The Ultimate Skillet-Charred Naan Experience
- The Perfect Bubble: We use a specific ratio of yeast and Greek yogurt to ensure the dough creates those iconic air pockets that char beautifully against a hot surface.
- Glossy Garlic Finish: Unlike recipes that use garlic powder, we use real minced garlic bits infused into melted butter for an authentic, pungent aroma.
- Visual Forensics: This recipe results in the exact oval-shaped, soft-edged flatbreads seen in professional culinary photography, complete with a fresh cilantro garnish.
- Textural Harmony: You get a soft, thick bite that is sturdy enough to scoop up a chicken ramen garlic sauce or a hearty stew.
Essential Elements for an Authentic Garlic Naan Bread Recipe
To achieve the visual and structural results described in our blueprint, every ingredient serves a dual purpose: flavor and physics. We aren’t just making bread; we are engineering a vessel for garlic and butter.
All-Purpose Flour (500g / approx. 4 cups): This provides the necessary structure without being as tough as bread flour. It allows the naan to remain pliable enough to stack three-high without cracking.
Active Dry Yeast (7g / 2 ¼ tsp): The leavening agent responsible for those gorgeous toasted bubbles. It creates the carbon dioxide gas that expands rapidly when the dough hits the hot skillet.
Warm Water (180ml / ¾ cup): Crucial for hydrating the yeast. Ensure it is between 105°F and 115°F (40°C-46°C) to wake the yeast up without killing it.
Full-Fat Greek Yogurt (120g / ½ cup): The “secret” for tenderness. The acidity in the yogurt weakens the gluten just enough to create that “soft, bubbly” texture seen in our Midjourney prompt.
Granulated Sugar (1 tbsp / 12g): Beyond sweetness, sugar aids in the Maillard reaction. This ensures your naan develops those deep golden-brown highlights under the butter glaze.
Kosher Salt (1 ½ tsp / 9g): A foundational invisible ingredient. Salt tightens the gluten structure and ensures the bread doesn’t taste flat or metallic.
Vegetable Oil (2 tbsp / 30ml): Added to the dough to provide a “short” crumb, making the edges soft and slightly irregular rather than crispy like a cracker.
Unsalted Butter (60g / 4 tbsp): This will be melted to create the glossy yellow glaze that defines the top naan in our visual blueprint.
Fresh Garlic (4-5 cloves): Must be finely minced. These visible bits of garlic are the star of the show, providing both texture and intense flavor.
Fresh Cilantro (1 small bunch): Finely chopped green cilantro provides the color contrast against the yellow butter and charred bubbles.
Tools Required for Professional Results
Achieving restaurant-quality charring requires the right conductive surfaces. While a tandoor is traditional, a cast-iron skillet is the best home substitute for this Garlic Naan Bread Recipe.
A heavy-bottomed cast iron skillet is preferred because it retains heat exceptionally well, mimicking the intense environment of a clay oven. You will also need a rolling pin to achieve those oval shapes, a pastry brush for the “glossy melted yellow garlic butter glaze,” and a large mixing bowl for the fermentation process.

Mastering the Art of Bubbly Leavened Flatbread
Phase 1: Activating the Yeast and Mixing the Dough
In a small bowl, combine your warm water (180ml) and sugar. Sprinkle the active dry yeast over the top and let it sit for about 5-10 minutes. You are looking for a foamy, frothy head to develop; this is the sensory cue that your yeast is alive and ready to lift your bread.
In a large mixing bowl, whisk together the flour and salt. Create a well in the center and pour in the yeast mixture, the Greek yogurt, and the vegetable oil. Use a wooden spoon or your hands to bring the dough together. It should feel slightly tacky but not stick aggressively to your fingers.
Phase 2: The Knead and the First Rise
Turn the dough onto a lightly floured surface. Knead for 5-7 minutes until the dough becomes smooth and elastic. If you find the dough is too dry, add a teaspoon of water at a time; if it’s too sticky, a dusting of flour will help. Place the dough in a greased bowl, cover with a damp cloth, and let it rise in a warm spot for 60-90 minutes, or until doubled in size.
Phase 3: Shaping the Iconic Oval Naan
Once the dough has risen, punch it down to release the excess gas. Divide the dough into 8 equal portions. Roll each portion into a ball. Using a rolling pin, roll each ball into an oval shape, roughly 6 inches (15cm) long and ¼ inch (0.6cm) thick. Don’t worry about perfect symmetry; those “slightly irregular edges” are what give homemade naan its charm.
Phase 4: The Skillet Charring Process
Heat your cast iron skillet over medium-high heat until it is nearly smoking. Do not add oil to the pan; we want dry heat for the best char. Place one oval of dough into the skillet. Within 30-45 seconds, you should see large bubbles forming on the surface—this is the “leavened texture” in action.
Flip the naan and cook for another 30-60 seconds. You are looking for distinct golden-brown charred bubbles on both sides. Remove the naan and place it on a clean towel to keep it soft while you finish the rest of the batch.
Phase 5: The Garlic Butter Glaze and Garnish
In a small saucepan or microwave-safe dish, melt the butter. Stir in the finely minced garlic bits. While the naan is still hot, use a pastry brush to apply a “heavy brush of glossy, melted yellow garlic butter glaze” to the top of each piece. Immediately sprinkle with the finely chopped fresh green cilantro so it adheres to the butter.
Expert Tips for Success
- The Yogurt Temperature: Ensure your yogurt is at room temperature before adding it to the dough. Cold yogurt can shock the yeast and slow down the rise, resulting in a dense bread rather than a bubbly one.
- High Heat is Key: If your naan isn’t bubbling, your pan isn’t hot enough. The thermal shock of the dough hitting the hot iron is what creates the air pockets.
- Rest the Dough: If the dough keeps shrinking back when you try to roll it into an oval, let it rest for 5 minutes to relax the gluten.
- Avoid Overcrowding: Cook only one naan at a time to maintain the skillet’s surface temperature.
What to Serve With Your Garlic Naan
This Garlic Naan Bread Recipe is the ultimate companion for saucy dishes. It is sturdy enough to be used as a wrap for an easy chicken quesadilla-style fusion or served alongside creamy garlic chicken thighs for a double dose of allium goodness.
If you have leftover dough, you can experiment with a sourdough discard version for a tangier profile. For a full meal, pair this naan with perfectly sautéed vegetables or use it to soak up the sauce from sticky garlic chicken noodles.
Storage, Reheating, and Freezing
To keep your naan soft, store it in an airtight container or a zip-top bag at room temperature for up to 2 days. To reheat, wrap the naan in a damp paper towel and microwave for 15-20 seconds, or place it in a dry skillet over medium heat for 30 seconds per side to refresh the char.
You can also freeze these breads for up to 3 months. Place parchment paper between each naan to prevent sticking, and store them in a freezer-safe bag. Thaw at room temperature before reheating as directed above.
Frequently Asked Questions
While yeast provides the best ‘bubbly’ and ‘leavened’ texture, you can substitute it with a combination of baking powder and extra yogurt, though the bubbles will be smaller and the texture less airy.
You can, but you will miss out on the ‘visible bits of minced garlic’ described in the visual blueprint. For the best flavor and appearance, fresh garlic infused in butter is superior.
Immediately wrap the cooked naan in a clean kitchen towel. This traps the steam and prevents the bread from drying out and becoming brittle.
Yes, the acidity in Greek yogurt tenderizes the gluten, ensuring the edges stay soft and thick rather than becoming crispy like a pizza crust.
The most common reason is a skillet that isn’t hot enough. The pan needs to be high-heat and dry (no oil) to create the rapid steam expansion needed for large bubbles.
The Ultimate Garlic Naan Bread Recipe Card

Garlic Naan Bread Recipe: Soft, Bubbly, and Better Than Takeout
Ingredients
Equipment
Method
- Combine warm water (180ml), sugar, and yeast. Let sit for 10 minutes until foamy.
- Mix flour and salt. Add yeast mixture, yogurt, and oil. Knead for 5-7 minutes until smooth and elastic.
- Place dough in a greased bowl, cover, and let rise in a warm spot for 60-90 minutes until doubled.
- Divide dough into 8 balls. Roll each into an oval shape, 1/4 inch thick.
- Heat a dry skillet over medium-high. Cook each naan until large bubbles form and bottom is charred (about 45 seconds). Flip and cook 30 seconds more.
- Stir minced garlic into melted butter. Brush heavily over hot naan and sprinkle with cilantro.
Notes
Don't skip the yogurt; it's essential for the soft texture.

Closing & Call to Action
Mastering the Garlic Naan Bread Recipe is a rite of passage for any home cook who loves bold flavors and satisfying textures. The combination of the charred, bubbly bread and that glossy garlic-cilantro finish is truly unmatched. Whether you are serving this with a traditional curry or using it as a base for a flatbread pizza, it is sure to be the star of the meal.
Did you get those perfect golden-brown bubbles? Let us know in the comments below! If you loved this recipe, please share it on Pinterest and tag us in your creations.